
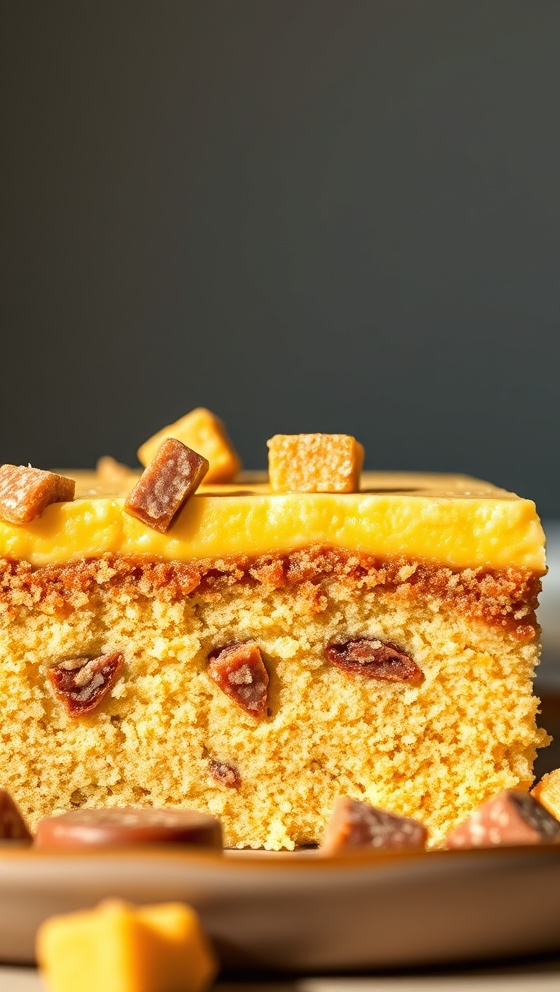
Butterfinger Candy Bar Poke Cake
Introduction
Are you ready to elevate your dessert game with a delectable treat that combines the flavors of chocolate and peanut butter? Look no further than a Butterfinger Candy Bar Poke Cake. This dessert is not only visually appealing but also manages to strike a glorious balance between moist cake, rich chocolate, and an irresistible crunch reminiscent of your favorite Butterfinger candy bars. In today’s post, we will explore how to create this mouthwatering masterpiece that will leave your family and friends in awe. Follow along for an easy-to-follow guide with tips, alternatives, and common pitfalls to avoid.
Ingredients List
Creating a Butterfinger Candy Bar Poke Cake involves a mix of simple ingredients that come together beautifully. Here’s what you need:
– 1 box chocolate cake mix (and required ingredients as per box instructions)
– 1 can (14 oz) sweetened condensed milk
– 1/2 cup chocolate syrup
– 2 cups whipped topping (like Cool Whip)
– 5-6 Butterfinger candy bars, crushed
– Optional: Chocolate shavings for garnish
Timing
Timing is crucial in the baking process to ensure perfect results. Here’s an estimated breakdown for this recipe:
– Preparation Time: 20 minutes
– Baking Time: 30-35 minutes
– Cooling Time: 1 hour
– Chilling Time: 3-4 hours (or overnight for best results)
– Total Time: Approximately 5 hours (including chilling)
Planning adequately will help you serve this amazing Butterfinger Candy Bar Poke Cake at the perfect moment.
Step-by-Step Instructions
Now, it’s time for the fun part—making your Butterfinger Candy Bar Poke Cake! Follow these step-by-step instructions to ensure success.
1. Preheat the Oven: Start by preheating your oven according to the instructions on the chocolate cake mix box.
2. Prepare the Cake Batter: In a mixing bowl, combine the chocolate cake mix with the required ingredients. Beat as directed until smooth.
3. Bake the Cake: Pour the batter into a greased 9×13 inch baking pan and spread evenly. Bake in the preheated oven until a toothpick comes out clean, typically about 30-35 minutes.
4. Cool the Cake: Once baked, remove the cake and let it cool in the pan on a wire rack for about 10 minutes.
5. Poke the Cake: After cooling, use the handle of a wooden spoon or a skewer to poke holes all over the top of the cake. This is an essential step for the poke cake concept and allows the cake to absorb the delicious toppings.
6. Combine Sweetened Condensed Milk and Chocolate Syrup: In a bowl, mix the sweetened condensed milk with chocolate syrup.
7. Pour Over the Cake: Pour this mixture evenly over the top of the warm cake so it seeps into the holes you made.
8. Add Whipped Topping: Spread the whipped topping evenly over the cake to create a creamy layer.
9. Add Butterfinger Toppings: Sprinkle the crushed Butterfinger candy bars generously over the whipped topping, ensuring that each slice will have that signature candy flavor.
10. Chill: Cover the cake with plastic wrap and refrigerate for at least 3-4 hours, or overnight for optimal taste absorption.
This Butterfinger Candy Bar Poke Cake is now ready for slicing and serving.
Nutritional Information
Understanding the nutritional content of the Butterfinger Candy Bar Poke Cake is important, especially if you’re watching your diet. Although this cake is indulgent, here’s a general idea of what you’re getting per slice (assuming 12 slices):
– Calories: 320
– Total Fat: 18g
– Saturated Fat: 8g
– Cholesterol: 40mg
– Sodium: 200mg
– Total Carbohydrate: 37g
– Dietary Fiber: 1g
– Sugars: 25g
– Protein: 4g
Enjoying this cake as an occasional treat can be a delightful way to satisfy your sweet tooth while still being aware of your nutritional goals.
Tips
To ensure your Butterfinger Candy Bar Poke Cake turns out perfectly, consider the following tips:
– Use room temperature ingredients for the cake mix for a smoother batter.
– Do not skip the chilling time. This step allows the flavors to meld beautifully.
– Crush the Butterfingers finely yet coarsely so some chunks remain for texture while still providing a dusting of flavor.
– For an extra indulgent topping, drizzle additional chocolate syrup before serving.
– This cake can also be made in advance, as it stays fresh for several days in the refrigerator.
Alternative Methods
If you’re looking for variants to this recipe, here are a few alternatives you might consider:
– Different Cake Base: Instead of a chocolate cake mix, try using a yellow cake mix for a unique spin, or even a gluten-free version if required.
– Ice Cream Version: Transform this poke cake into an ice cream cake by layering softened ice cream instead of whipped topping. Let it chill until firm before serving.
– Different Candy Bars: If Butterfinger isn’t available or you want to switch things up, try Snickers, Reese’s cups, or any other chocolate-peanut butter combination for a fun twist.
Common Mistakes to Avoid
Baking can be tricky, and avoiding common mistakes can help achieve the perfect Butterfinger Candy Bar Poke Cake:
– Not allowing the cake to cool properly: This may lead to melting the whipped topping and ruining the appearance.
– Forgetting to poke holes: This step is crucial for absorbing the syrup mixture, so don’t skip it.
– Using too much chocolate syrup: Ensure to follow the proportions given, or else it can make the cake overly sweet or soggy.
– Overmixing the cake batter: This can result in a dense cake—mix just until everything is combined.
Conclusion
In conclusion, the Butterfinger Candy Bar Poke Cake serves as a fantastic dessert option for any occasion. Its unique blend of flavors and textures will leave everyone craving more. By following the recipe and tips provided, you’ll experience a sweet sensation that brings the nostalgia of Butterfinger candy bars to life in cake form. Don’t forget to share your creation with loved ones and encourage them to visit my website for more mouthwatering recipes!
FAQs
1. How do I store leftovers?
Store any leftovers in an airtight container in the refrigerator for up to five days.
2. Can I freeze this cake?
Yes, you can freeze the cake! However, it’s best to freeze it before adding the whipped topping and toppings. Thaw in the refrigerator before serving.
3. Can I make this cake in advance?
Absolutely! Just ensure to chill it for at least a few hours to allow the flavors to develop before serving.
4. What can I use instead of sweetened condensed milk?
You can replace it with a mixture of evaporated milk and sugar, or consider using a dairy alternative, although the texture may vary.
5. Can I adjust the sugar content?
You can reduce the sugar in the cake mix itself, but be cautious with too much alteration, as it may change the texture.
With these tips and guidance in hand, you’re now prepared to create and enjoy your very own Butterfinger Candy Bar Poke Cake. Happy baking!
Butterfinger Candy Bar Poke Cake
Ingredients
- 1 box chocolate cake mix
- 1 cup Butterfinger candy bars, crushed
- 1 cup chocolate pudding
- 1 cup whipped topping
- Chocolate syrup for drizzling
Instructions
- Prepare the chocolate cake mix according to package instructions and bake in a 9×13 inch pan.
- Once baked, let the cake cool for 10 minutes, then poke holes all over the top with a fork.
- Pour the chocolate pudding over the cake, ensuring it fills the holes.
- Spread the whipped topping over the pudding layer.
- Sprinkle crushed Butterfinger candy bars on top and drizzle with chocolate syrup.
- Refrigerate for at least 2 hours before serving.
Nutrition Information
- Calories: 350 kcal
- Protein: 4g